1. This testing and commissioning procedure is issued by Mars Belt Engineering, as the vendor for pipe belt conveyors.
2. This document outlines the detailed procedure for testing and commissioning a new pipe conveyor belt to ensure it meets design specifications and operational standards before being put into service.
3. This procedure applies to all newly installed or replaced pipe conveyor belts during the testing and commissioning phases.
4. Pipe belt overlap
The overlap direction of the pipe conveyor belt should align with the direction of the horizontal turns to enhance its resistance to twisting and collapsing. Generally, the overlap direction is determined by considering the horizontal turning direction and the belt tension. For simple routes, the overlap direction of the pipe conveyor belt can be referenced as shown in the diagram below.
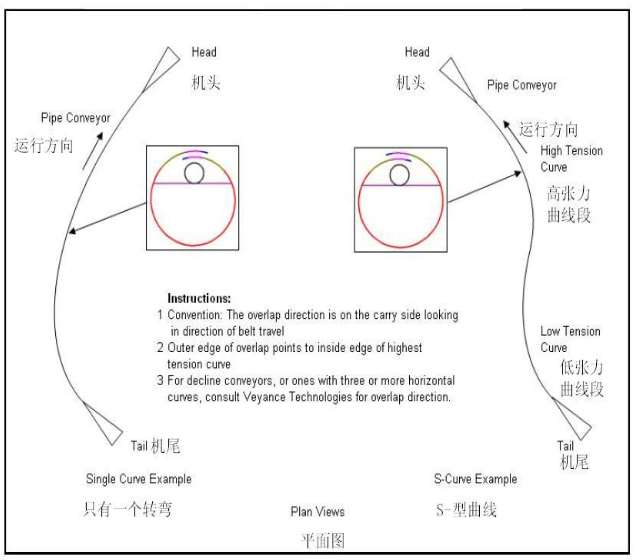
Instructions:
a.Standard: The overlap direction shown in the diagram is based on the material side looking towards the running direction.
b. Overlap Direcon: The outer edge of the overlap should face the inside of the highest tension curve section. The return section should have the same overlap direction as the material section, ensuring that the contaminated belt edge remains on the inside of the overlap area during the return section.
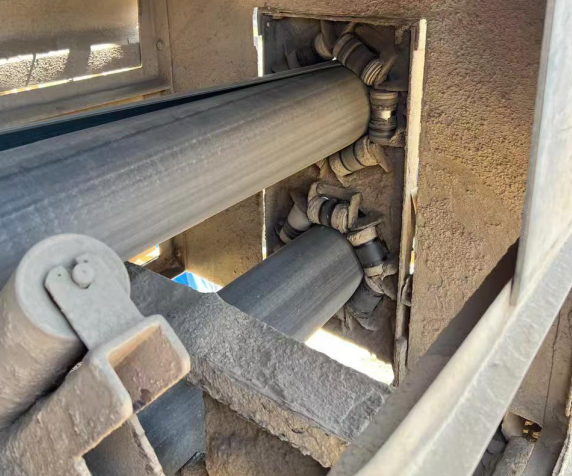
5. If the belt first comes into contact with the side wing rollers during operation, it can easily cause damage to the belt edges. When the belt is running, it should first make contact with the top upper rollers and bottom lower rollers, and only then should it come into contact with the side rollers.
6. Pre-Testing and Commissioning Preparation
6.1 Equipment Inspection
- Inspect the pipe conveyor belt and related equipment to ensure proper installation and secure all connection components.
- Verify the belt alignment and check for any signs of misalignment.
- Ensure all safety devices (e.g., emergency stop buttons, guard rails) are functional.
-
Ensure all the rollers are in good condition or not stuck. Replace bad/stuck rollers (mandatory).
6.2 Site Cleaning
- Remove any obstacles and debris from the conveyor belt and surrounding area, ensuring the site is clean and safe.
- Confirm that the conveyor belt path is clear of any items that could interfere with operation.
6.3 Personnel Preparation
- Ensure that operating and maintenance personnel are familiar with the testing and commissioning process and their responsibilities.
- Provide necessary safety training to all involved personnel, ensuring they understand all emergency procedures.
7. Testing Procedure
7.1 Non load Test Run
- Check all rollers, to ensure all the rollers are in good condition (rotating)
- The stuck rollers shall be replaced, stuck rollers caused belt damage.
- Standby person shall be placed on the bending area (high tension curve)
- Release the counter weight to a normal position and mark the position.
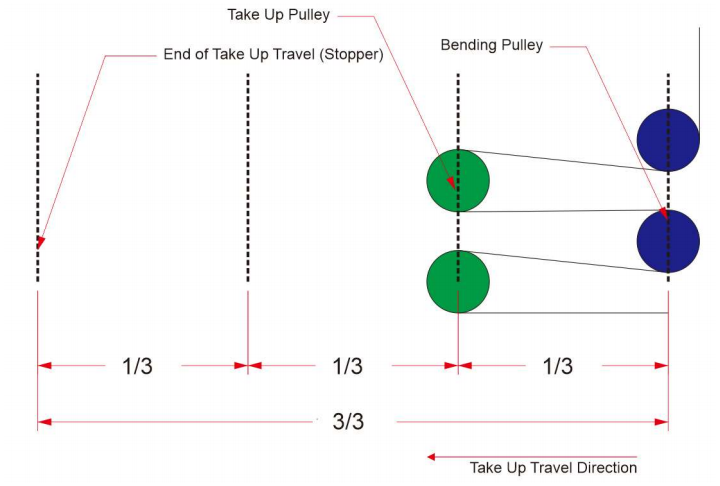
- For the best performance, the take-up pulley position shall be 1/3 take-up travel distance near the bending pulley.
- Start the conveyor belt for a no-load test run, checking for any abnormal noise or vibrations during operation.
- No load running and check the condition of the belt at the turn and the transition is close to open.
- Inspect the belt tension to ensure it is appropriate, neither too loose nor too tight during operation.
- Measure the amplitude of tension (m and %)
- Check the voltage and current of the motor.
- Continuous running no load 24 hours.
- The belt should continue running until the belt can be in a circular pattern and not drag the 7-day estimate. Can be filled or no load.
- For the new belt, it is usually a bit heavy. Because kicking or contact to the roller is stronger in all directions.
- For the new belt, the elongation during non load test is app.0.2%.
- Upon successful completion of the no-load test run, gradually introduce material onto the conveyor for a load test run.
- Standby person shall be placed on the bending area (high tension curve)
- Inspect the belt tension to ensure it is appropriate, neither too loose nor too tight during operation.
- Check the voltage and current of the motor.
- Observe the conveyor belt’s performance under load, checking for any misalignment or
spillage. - Ensure the drive and braking systems function correctly under load conditions.
- For the new belt, the elongation during loading test is app.0.2%.
8. Commissioning Procedure
8.1 Alignment and straightening of pipe conveyor belt
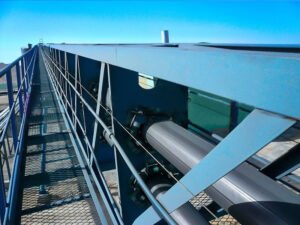
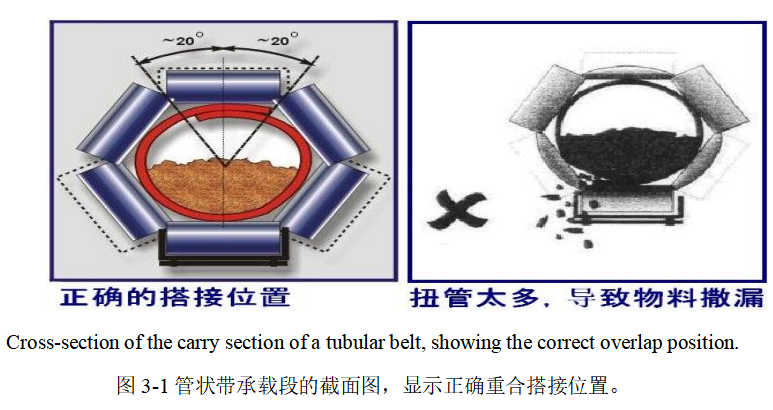
Proper alignment and straightening of the pipe conveyor belt are crucial. This prevents the belt from rubbing against or colliding with the structure of the pipe conveyor machine and the feed chute, thereby avoiding irreparable damage to both the belt and the machine. Correct alignment also helps prevent material spillage along the way due to improper overlap positions in the carrying section (such as twisting or snaking of the belt). Figure 3-1 illustrates the correct overlap position in the carrying section of the pipe conveyor belt.
8.2 Commissioning process
The correct commissioning process of a pipe conveyor belt must be carried out under no-load, partial load, and full-load conditions. After the pipe conveyor is fully installed and passes inspection, and once the gearbox and lubricated parts are filled with oil, a no-load test run should be conducted. During this test, observe the operation of the gearbox, motor, rollers, and belt, and record the temperature and vibration of the gearbox, motor, and rollers. During the no-load test, pay attention to whether there is any twisting of the belt, the operating temperature of the drive components, the movement of the rollers, the tightness of the contact between the cleaning devices and the belt surface, and the alignment of the guide plates with the belt. Necessary adjustments should be made to ensure all components are functioning correctly before proceeding to the load-bearing test run.
Start with a no-load operation, with monitoring personnel stationed along the conveyor. Observe the rotation direction of the belt at the head and tail during startup. If the overlap position rotates clockwise or counterclockwise by more than 20° (as shown in Figure 3-1), adjustment is necessary. Pay special attention to the operation of the belt in the transition section, ensuring that the flat belt can be formed into a pipe and that the pipe belt can be flattened as required. If this is not happening, adjust the rollers in the transition section.
After the no-load startup of the pipe conveyor, use the hexagonal roller framework as a reference to observe the overlap position of the pipe belt. It is preferable to have one person perform the alignment and straightening of the pipe belt, especially over long distances, to avoid repeated adjustments of the same set of rollers. The adjustment should start from the tail roller, progress along the carrying section toward the feeding section, and continue to the head roller. After reaching the head, proceed through the drive roller, tensioning device, and return along the return section back to the tail roller. If the overlap section of the pipe belt is not directly above the hexagonal roller frame (+20°), the alignment rollers must be adjusted. The roller supports of the pipe conveyor generally have two alignment rollers installed—one in the carrying section and one in the return section. The alignment roller is usually the bottom roller of the hexagonal roller group and is mounted on a bracket with an adjustable slot, as shown in Figure 3-2.
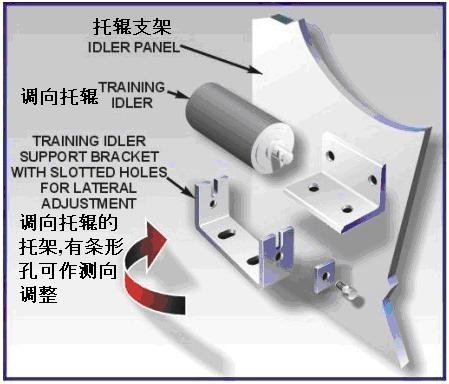
Figure 3-2
If the bottom rollers cannot be adjusted, but instead, the alignment is achieved by adjusting the tilt angle of the two side rollers below, it’s important to note that the tilt angle should not exceed 2°, and the total number of adjustments should not exceed one-tenth of the total number of rollers. Exceeding these limits can cause severe abnormal wear on the non-working surface of the pipe belt’s cover rubber, thereby reducing the belt’s lifespan.
When commissioning the pipe conveyor belt, the first step is to decide whether the belt should be adjusted clockwise or counterclockwise to position the overlap in the carrying section directly above the roller frame or the overlap in the return section directly below the roller frame. To achieve this, the cause of the belt misalignment must be identified, meaning that the point where the misalignment begins needs to be found. Adjustments should then start from the rollers at that location.
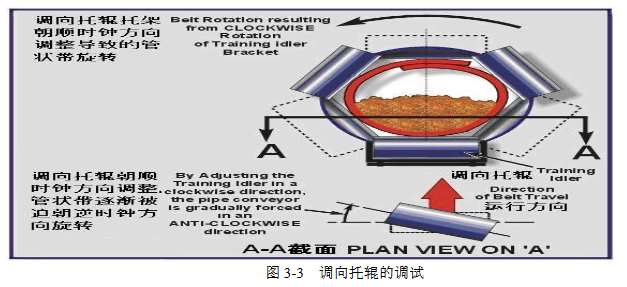
Once the misaligned rollers are identified, slightly loosen the screws fixing the roller bracket to allow movement of the bracket. To correct the pipe conveyor belt, the bracket of the alignment roller should be shifted in the correct direction. Figure 3-3 illustrates the impact of shifting the alignment roller bracket and roller, which is similar to adjusting the tracking of a conventional flat belt.
Care should be taken to avoid excessive adjustments to the alignment rollers. Make small adjustments, tweaking three to four alignment rollers at a time, and then observe for about five minutes to see the effect before deciding whether further adjustments are needed.
Mark the adjusted alignment rollers on the frame for future reference. If, after adjusting a series of alignment rollers, the alignment of the pipe belt does not improve, these alignment rollers should be returned to their original positions. Only then should the next series of alignment rollers be adjusted. This systematic approach is the correct way to commission a pipe conveyor belt.
Once the no-load operation is properly adjusted, a load-bearing test run can be conducted, starting with a partial load and then progressing to a full load. It is important to note that when the conveyor is loaded unevenly, the belt’s center of gravity may shift frequently, causing tension fluctuations and increasing the likelihood of belt twisting.
After the commissioning is completed, all the screws on the alignment roller brackets must be tightened again. In summary, after commissioning, the following requirements should be met:
- The overlap section of the pipe belt should be directly above the hexagonal roller frame (+20°).
- The pipe belt should not exhibit any twisting.
- The alignment rollers should have good contact with the belt.
- The vibration and temperature of the gearbox and motor should meet the required standards.
- The tensioning device should function normally during startup and shutdown, with no belt slippage.
- There should be no belt scratches or unacceptable friction.
- All rollers should rotate freely when the belt is loaded.
- The operating temperature of the bearings should be stable: sliding bearings should be <65°C, and rolling bearings should be <80°C.
- Bearings and rotating parts should exhibit no abnormal conditions.
- There should be no oil leaks or lubricant slippage.
- The control system should operate correctly, and the system should be responsive.
- Output should meet the standard.
- Interlocks and all emergency buttons should function properly.
- The gap between the rubber skirt of the guide chute and the belt should be appropriate.
- The hydraulic coupling should not overheat.